
How to Install Metal Handrails for Concrete Stairs
How to install metal handrails for concrete stairs is one of the most useful upgrades for safety and style in any home. Many homeowners prefer metal handrails for concrete stairs because they are strong, long-lasting, and easy to maintain. Whether you are upgrading outdoor steps or a basement entry, proper installation ensures daily safety and better support. In addition, well-installed railings improve the overall look of your property and increase its value over time.
Key Takeaways:
-
Accurate measurement is the most important step
-
Strong anchors are required for concrete surfaces
-
Proper tools make the job faster and safer
-
Outdoor railings need weather protection
-
Regular maintenance increases lifespan
Why Install Metal Handrails on Concrete Stairs
Installing metal handrails is not just about design; it is mainly about safety and comfort. Concrete stairs can become slippery due to rain, dust, or wear over time. A strong railing gives support while walking up or down, reducing the risk of accidents. In addition, metal railings are known for their durability, which makes them a long-term investment for any property.
Metal railings also improve the overall appearance of your stairs. They create a modern and clean look that works well in both residential and commercial spaces. Many people also use similar designs for metal handrails for decks to maintain a consistent style across outdoor areas.
Main benefits:
-
Better grip and balance while using stairs
-
Increased safety for children and elderly
-
Long-lasting compared to wood railings
-
Low maintenance and easy cleaning
-
Enhances overall home value
Tools and Materials You Will Need
Before starting the installation, it is important to gather all the required tools and materials. This preparation saves time and helps you avoid interruptions during the process. Using proper tools also ensures that the installation is strong, neat, and long-lasting.
You should always choose high-quality materials because they directly affect the durability of your handrail. Cheap materials may lead to loose fittings or early damage. Investing in good tools and components will make your work easier and safer.
Essential tools:
-
Hammer drill with masonry bit
-
Measuring tape
-
Spirit level
-
Marker or chalk
-
Wrench and screwdriver
Required materials:
-
Metal handrail kit
-
Mounting brackets
-
Concrete anchors or sleeve bolts
-
Protective sealant
Step 1: Measure and Plan Properly
Planning is the foundation of a successful installation. If your measurements are incorrect, the entire railing may become uneven or unstable. Take your time during this step and ensure every detail is accurate before moving forward.
Start by measuring the full length of the stairs and deciding the correct height of the handrail. Most standard railings are installed between 34 to 38 inches. Also, make sure your markings follow the slope of the stairs so the railing sits naturally.
Planning checklist:
-
Measure total stair length
-
Decide handrail height (usually 34–38 inches)
-
Mark bracket positions evenly
-
Align with the slope of stairs
-
Double-check all markings
Step 2: Mark the Drilling Points
After planning, the next step is marking where you will drill. This step helps you place the brackets in the correct positions. Accurate marking ensures that the railing will be straight and secure once installed.
Use a pencil, chalk, or marker to clearly show each drilling point. Keep equal spacing between brackets to distribute weight evenly. Before drilling, always review your markings to confirm they match your measurements and alignment.
Tips for marking:
-
Use visible marking tools
-
Keep equal spacing between brackets
-
Ensure straight alignment
-
Check measurements again
-
Avoid edges to prevent cracks
Step 3: Drill Holes into Concrete
Drilling into concrete requires patience and the right technique. This step is very important because poorly drilled holes can weaken the entire structure. Always use a hammer drill with a masonry bit to get clean and accurate holes.
Work slowly and maintain a steady hand while drilling. After drilling, clean out dust from the holes because leftover debris can affect how well the anchors fit. Safety is also important, so wear gloves and protective glasses during this step.
Drilling best practices:
-
Use a hammer drill for better performance
-
Drill slowly and steadily
-
Maintain straight angles
-
Clean dust from holes
-
Wear safety gear
Step 4: Install Anchors and Brackets
Anchors and brackets are the backbone of your handrail system. They hold everything in place, so they must be installed securely. If anchors are weak or loose, the railing may become unsafe over time.
Insert anchors into the drilled holes and position the brackets on top. Tighten the bolts firmly and use a level to ensure everything is straight. This step may take time, but it is crucial for long-term stability.
Installation steps:
-
Insert anchors into holes
-
Place brackets correctly
-
Tighten bolts securely
-
Check alignment with level
-
Ensure no movement
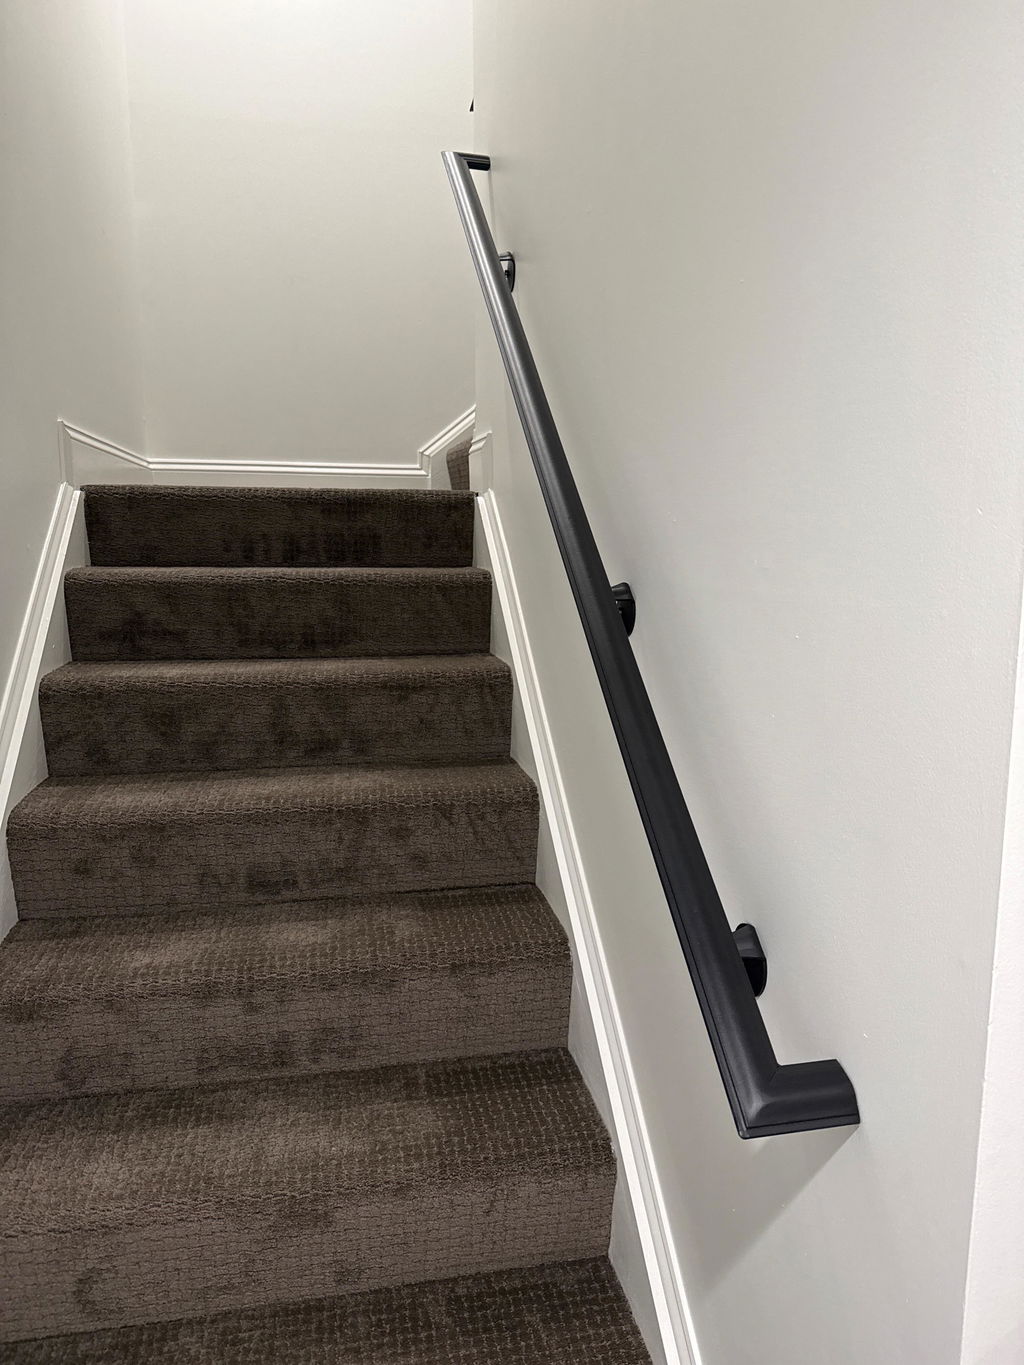
Step 5: Attach the Handrail
Once the brackets are secure, you can attach the handrail. This step completes the main structure and gives your stairs a finished look. Proper alignment is very important here to ensure both comfort and safety.
Carefully place the handrail onto the brackets and secure it using screws or bolts. Make sure all connections are tight and the railing follows the natural slope of the stairs. Take your time to adjust if needed.
Attachment tips:
-
Align handrail with stair angle
-
Secure with strong fasteners
-
Tighten all connections
-
Check for gaps or looseness
-
Adjust if necessary
Step 6: Test Strength and Safety
After installation, always test the strength of your handrail. This step ensures that it is safe for everyday use. A properly installed railing should feel solid and stable when pressure is applied.
Push and pull the railing gently to check for movement. If you notice any looseness, tighten the bolts immediately. Safety checks are essential, especially in homes with children or elderly family members.
Safety checklist:
-
Test stability with pressure
-
Check all bolts and screws
-
Ensure correct height
-
Inspect bracket strength
-
Fix loose parts quickly
Outdoor Installation Tips
Outdoor installations need extra care because they are exposed to weather conditions. Rain, sunlight, and temperature changes can affect metal over time. That is why protection is very important.
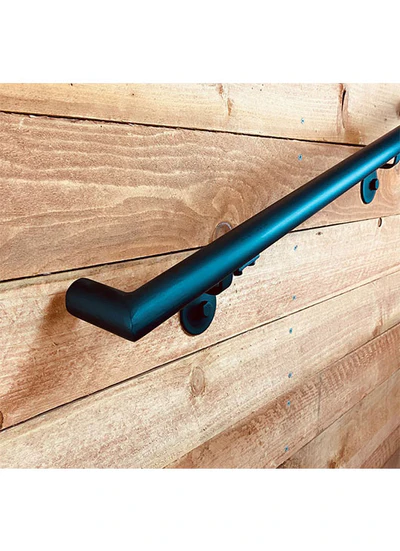
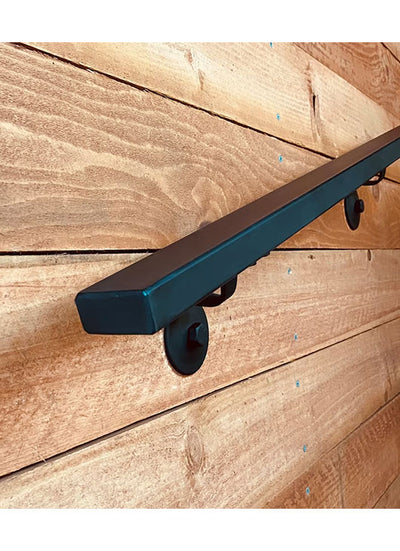
For example, metal handrails for concrete steps should always have a weather-resistant coating. This helps prevent rust and extends the life of the railing. Regular inspection is also important for outdoor setups. Products like Metal Handrails, Flat Black, with Wall Return are often used outdoors because they provide extra support and durability.
Outdoor care tips:
-
Use rust-resistant materials
-
Apply protective coatings
-
Seal drilled holes properly
-
Avoid water accumulation
-
Inspect after heavy weather
Maintenance Tips for Long-Term Use
Proper maintenance helps your handrails stay strong and look new for many years. Even though metal railings require less maintenance than wood, they still need regular care.
Simple cleaning and inspection can prevent bigger problems in the future. Make it a habit to check your railing every few months, especially if it is installed outdoors.
Maintenance checklist:
-
Clean regularly with soft cloth
-
Inspect bolts and brackets
-
Reapply coating if needed
-
Remove rust early
-
Check after bad weather
Extra Design Ideas for Modern Homes
Many homeowners like to match their railings with other metal elements in their home. This creates a consistent and modern look. For example, you can combine railings with industrial metal table legs or explore The Advantages of Custom Steel Table Legs for interior upgrades.
You can also experiment with finishes, shapes, and textures to match your style. These small design choices can make a big difference in the overall appearance of your space.
Popular ideas:
-
Shop table legs for workspaces
-
Round metal table legs for dining
-
Minimal black metal finishes
-
Matching metal accents across rooms
When to Call a Professional
While DIY installation is possible, some situations require expert help. Complex stair designs or uneven surfaces can make installation difficult. In such cases, hiring a professional ensures safety and proper fitting.
Professionals have the right tools and experience to handle challenging installations. They can also help you choose the best design and materials for your needs.
Hire a professional if:
-
Stairs are uneven or damaged
-
You lack proper tools
-
Design is complex
-
Safety concerns are high
-
You want a perfect finish
Conclusion
Learning how to install metal handrails for concrete stairs is a valuable skill that improves safety and style in your home. With proper planning, the right tools, and careful execution, you can achieve a strong and long-lasting installation. Metal railings not only provide support but also enhance the overall look of your stairs.
If you are looking for premium-quality railings or expert advice, visit today. Contact now to get the best metal handrail solutions for your home or project!
FAQs
How long does it take to install metal handrails for concrete stairs?
It usually takes around 2 to 4 hours, depending on stair size and experience level.
Can I install metal handrails by myself?
Yes, with proper tools and guidance, DIY installation is possible.
What anchors are best for concrete stairs?
Expansion anchors and sleeve anchors provide strong support.
Are metal handrails good for outdoor use?
Yes, they are ideal when protected with weather-resistant coatings.
How often should I maintain my handrails?
Inspect and clean them every few months for best performance.

Leave a comment
This site is protected by hCaptcha and the hCaptcha Privacy Policy and Terms of Service apply.